|
| shift chain |
 |
|
|
|
|
 |
Shift Chain can set up the range of
Bending Radius easily & freely! |
 |
| |
A
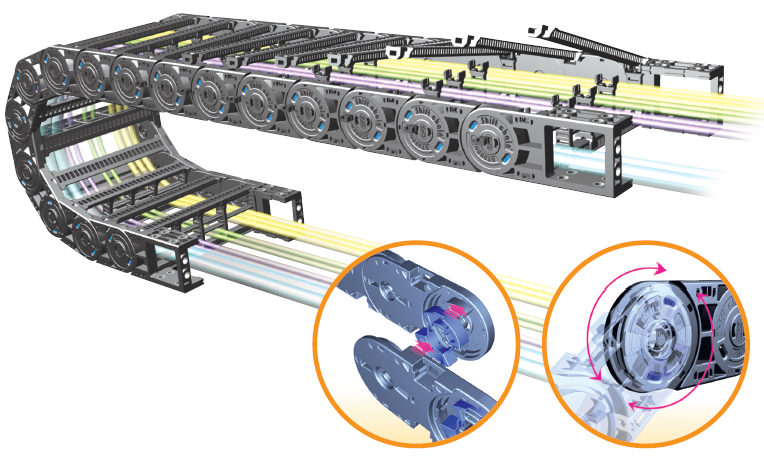
Shift Chain, with the unique structure, is a new concept that the value of
Bending Radius is decided by inserting the BR component. |
| |
B
Shift Chain, inserting the BR component, has more than 6 points of supporting
area, so its durability and self-supporting capacity are 30% more than
other Cable chain's. |
| |
C
Shift Chain has an excellent competitiveness and can create the maximum
synergy effect in relation to boosting productivity, the efficient stock
management and cost reduction because the side-band of each model
is the same and the BR component is designed to be replacable. |
| |
D
Shift Chain is the next generation Cable chain developed to protect the inner cables and hoses applied to equipments and machinery of overall
industries widely.
|
|
CHARACTERISTIC AND MERIT OF SHIFT CHAIN |
| |
|
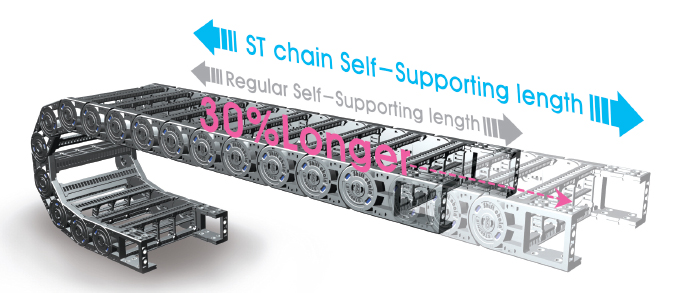
| 1 |
Longer Self-Supporting Length!
Shift Chain has max 30% longer self-supporting length than other CPS chains under the
same condition. It's designed to be durable, even with the massive inserted cables, can
effectively protect cables without any sagging.
while other chain has two points of supporting area, Shift Chain has six points of it, A, B,
C, D, E, F. It helps the side bands can have the maximum supporting.
| |
|
| |
Supporting points when the side bands connected.
(A, B, C, D, E, F) |
| |
|
| �� Shift chain Self- Supporting Length �� |
|
| |
Supporting points when the side bands bended.
(E, F) |
|
| 2 |
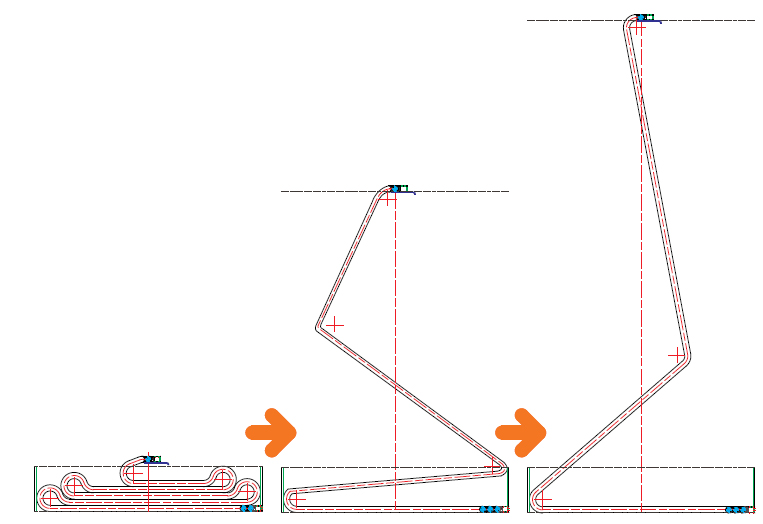
The Feature of Setting-up Unit 2 for Bending Radius!
Unlike the existing chains, the Shift Chain is designed to use only one side band for the
same model and to insert respective Bending Radius unit to make bending radius each.
Like the below pictures, the value of bending radius is changeable just by inserting individual
bending unit, and unlike the existing chains, it is suggested that you don't need side bands
for each bending radius in stock, but need BR unit for each bending radius, so the Shift
Chain has an excellent competitiveness to create the maximum synergy effect in relation
to easy maintenance, efficient stock management and cost reduction .
 |
| The Bending Radius combined by the Bending Radius unit(BR). |
When combining Side Band with the different Bending Radius unit, the bending radius of
cable chain is formed like the below and also the 'R' of cable chain will be decided by the
Bending Radius-setting unit. Bending Radius(R) of each cable chains is written with each
value of " R" in details of each cable chain.
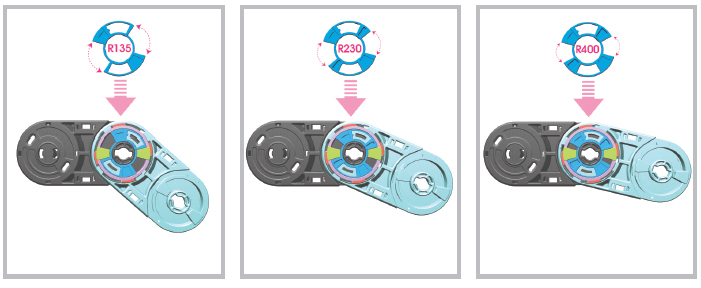 |
| In R135 BR connection |
In R230 BR connection |
In R400 BR connection |
|
| 3 |
Efficient & Easy fixing bracket, FEB!
Shift chain's bracket, FEB, is very
effective in a way that can be
mounted up, down and front side
same as the New Sabin chain. For
the extra enhance, steel washer is
inserted into the fixing hole.

| |
 |
| |
Bending direction of
FEB - Upper |
Bending direction of
FEB - Horizontal |
Bending direction of
FEB - Horizontal |
Bending direction of
FEB - Lower |
|
|
| 4 |
Teeth centered every 5mm eliminate movement during operation!
With teeth positioned every 5mm, Shift Chain's patented
grooves grip the dividers locking them in place and
eliminating any left or right movement during operation.
Furthermore, your cables are protected from the shock
of outside force as the dividers are locked in firmly and
securely ensuring that each of your cables center is
held intact and preventing sheathing caused by current
systems' inability to secure the dividers properly. Stoppers
can fall out or become damaged, resulting in more
maintenance and down time. With the Shift Chain divider,
you eliminate the need for small excess parts which
can break and possibly gain entry to and damage
operating machinery.
 |
| 5 |
More convenient frame structure - Hinged Type Frame!
The Hinge type frame is created by using the original frame but locking it into place with a
ball hinge on one side and making the cables easily accessible by opening the other. The
hinge type frame can open to expose the inserted cables on both the topside and underside
of the carrier.
In case of models of Shift chain(ST)072N, 095N, 120N, 150N type, one side of the frame
is fixed by inserting a fixing pin to prevent frame open, which caused by any external impact.
Also, in case of ST044N, 055N type, an open side of the frame is fixed by Hook type frame .
| |
|
| ST044N, ST055N - Hinge Hook Type |
ST072N, ST095N, ST120N, ST150N
- Hinge + Frame Pin Insert Type |
| |
|
|
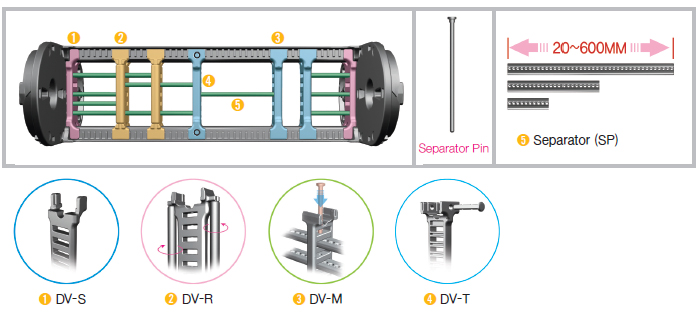
| 6 |
Diversity & Functionality Combine in
this New Separator and Divider Creation!
It can protect inner cable more efficient and safe with the diverse combination of Divider
and Separator. Divider consists of the exclusive use of side type (S-Type), the adhesive
use of roller type (R-Type) and the pin jointing type ( M-Type) and also the twist and damage
of inner cable can be protected especially because this part is designed to use of the fixing
pin strongly. The length of separator can be installed from 20 mm to 600 mm and be cut
and used 5 mm apart.
 |
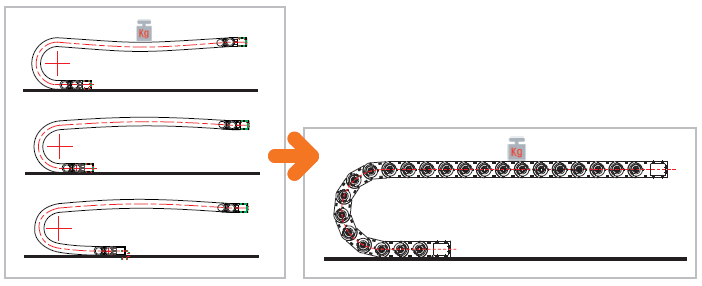
| 7 |
Straight supporting area of Shift chain by design with
strong bearing capability!
Shift chain completely solves the problems of both chain's sagging that happens in chain's
self-supporting area and chain's breakage & short lifespan caused by clearance between
the bottom of chain's bending part and ground, because the chain is designed not only to
have 6 supporting points on the sideband to enhance self-supporting but also to have
strong bearing capacity to support the connected side bands straight. In the above reason,
it can run straight at all times, no matter how much inserted cables weigh, without sag &
arch phenomenon in the self-supporting area of the chain, and protect cables safely since
clearance between the bottom of chain's bending part and ground doesn't happen.
|
| 8 |
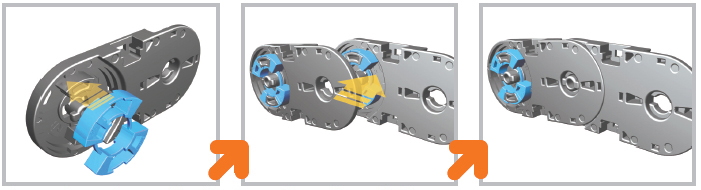
Without any tools, easy to assemble Side Band!
You don't need any tools to connect and disconnect side
bands of Shift chain, but can do that easily by hand, so it
saves time and the productivity improves.
|
| 9 |
Various applied installation including ST-Z series!
(Zig-Zag Chain)
Shift Chain is designed to be able to move in upper, lower and
diagonal directions according to machine's movement.
Changing a different Bending Radius value at the point that the
chain movement turn other sides can create the bending radius
or the reverse bending radius for the direction that you need,
so the machine can move in zigzag direction.
Shift Chain can be used for special usage such as a zigzag
chain, and has an excellent installation scalability in any hazard
environment for cable protection with the general chain. If you
need special chain installation, please contact our R&D center.
|
| 10 |
UV block and Anti-Electrostatic 10 Discharge!
Shift Chain is produced with high-quality engineering plastic material, which have strong
durability and great abrasion resistance, so the chain has less breakage possibility by outside
damage and performs stable cable protection in any difficult environment.
As the chain is verified through the tests for electrostatic discharge (ESD) and explosion
proof (ATEX-Dirctive 94/9/EC), it can be applied in stability to electric equipment and
machinery. Also, the chain is UV-coated, and can protect cable in outside installation of
the chain. Furthermore, the chain is produced with high-quality engineering plastic, which
include none of the 6 harmful substances (restrictives in the Europe market); Lead(Pb),
Cdmium(Cd), Mercury(Hg), Hexavalent Chromium (Cr6+), PBB, PB DEs etc and which is
recyclable and harmless both to user and enviornment.
 |
|
|
|
| |
| |
|
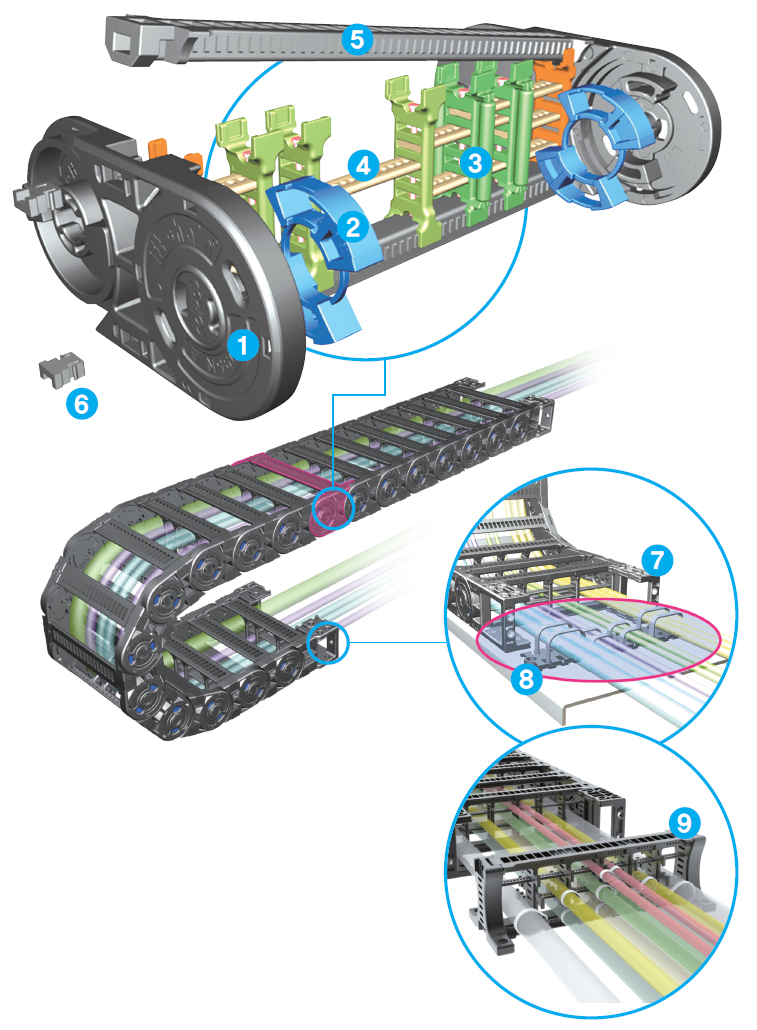
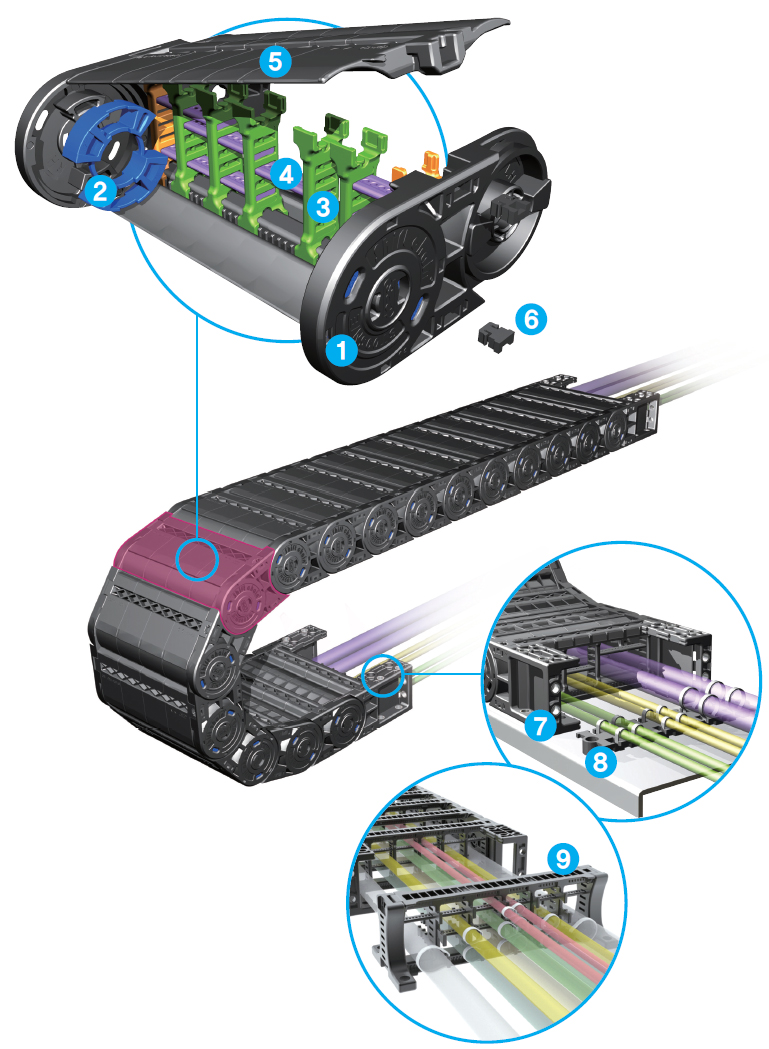
ARTICLE NAME & DETAILS OF
SHIFT CHAIN-Normal Type |
 |
| |
1 Side Band (SB)
Bending Radius unit, different from the former
connecting method of link pin bridge prevents
damage of the chain caused by breakdown
of connecting link pin and reduces dust
due to the friction of link pin.
|
2 Bending Radius Unit (BR)
Shift Chain has the unique structure that
the value of Bending Radius is decided by
Bending Radius unit .
|
3 Divider (DV-S, M, R, T)
Divider sets the inside of chain vertically to
prevent cable from twisting and sheath
damage caused by friction. There are S, M,
R and T type.
|
4 Separator (SP)
Separator divides the inserted cables
vertically to prevent twisting of cables and
damage of sheath. Can be cut by 5mm for
the convenience. When combining with
divider, using separator pin have SP fixed
hard not to move.
|
5 Frame (Hinged Type) (FR)
Hinged-type frame, open one side, supports
connection of both side of side band and
have tongue and groove system plate to
secure the position of the divider on the
frame.
|
6 Frame Pin (FP)
The connecting pin for preventing the
breakaway of Frame connected at Side
Band, combining and fixing the Frame and
Side Band. For Shift chain(ST)072N, 092N,
120N, 150N type, one side of the frame is
fixed by inserting a fixing pin to prevent
frame open, which caused by any external
impact. Also, in case of ST044N, ST055N
type, an open side of the frame is fixed by
Hook-type frame.
|
7 Free End Bracket (FEB)
Shift chain is very effective to be able to be
fixed at upper, lower and front direction
with the use of FEB (Free End Bracket) like
the fixing method of New Sabin Chain and
to be fixed stronger due to the use the Steel
Insert at the Fixing hole. Shift Chain has a
strong point that can be fixed with the
diverse ways because this Bracket can be
moved more than 45 degrees.
For ST150N, Bracket with steel it used.
|
8 Tie Wrap (TW)
Tie Wrap fixes the cables in one straight
line to prevent twisting or entangling during
operation. There are two types available
depending on the application; attached to
bracket and separated from bracket.
|
9 System Tie Wrap (STW)
System-Tie Wrap has to be assembled on
fixing and moving point of bracket and can
be assembled wthout any tie wrap plate.
This tie wrap is used to stay the cables on
several floors prevent the cables from being
twisting and it can also be assemble without
any tools or bolt. This tie wrap has two
types, one is to assemble inside bracket
the other one is outside.
|
|
|
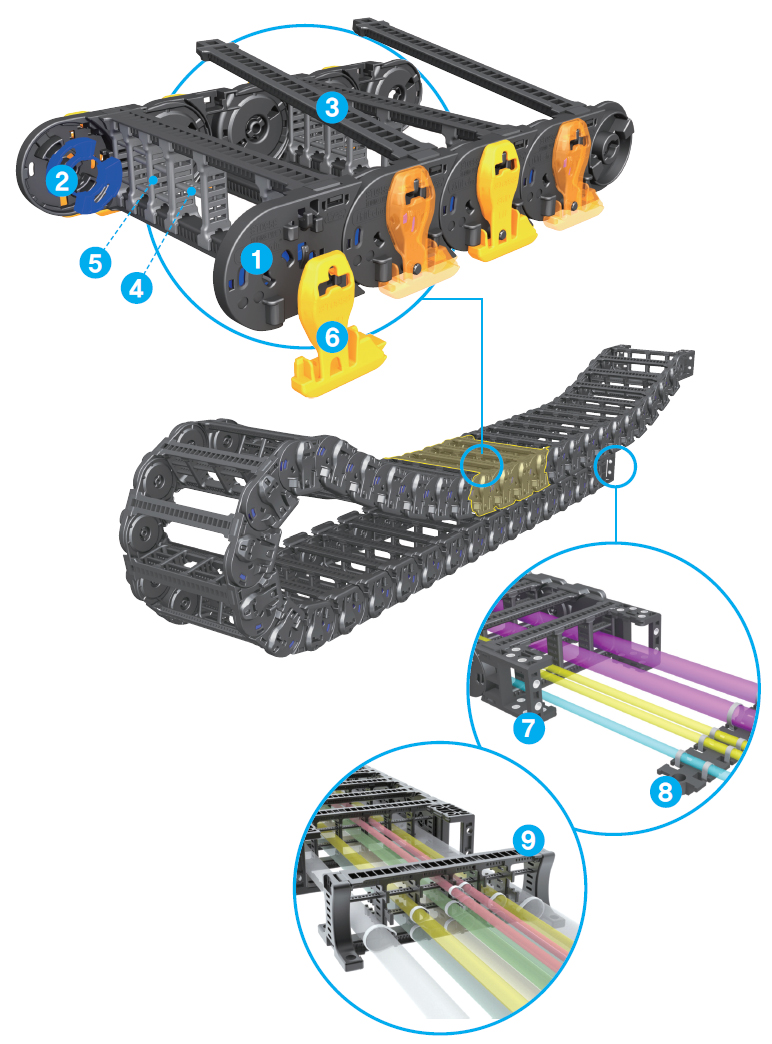
ARTICLE NAME & DETAILS OF
SHIFT CHAIN-Skid / Enclosde Skid-Type |
 |
| |
1 Side Band (SB)
Connecting Radius Value inserted Side
Band strengthen binding since the supporting
point of side band is designed as 6
separated points.
|
| |
2 Bending Radius (BR)
Shift Chain has the unique structure that
the value of Bending Radius is decided by
Bending Radius unit.
|
| |
3 Frame (FR)
[ FRU(D) ]
Frame is performed as a supporter of right
and left side bands and it is designed with
teeth to prevent divider from detaching.
|
| |
4 Separator (SP)
Dividing the inserted cables vertically to
prevent twisting of cables and damage of
sheath. Can be cut by 5mm for the convenience.
When combining with divider, using
separator pin it can be fixed hard not to
move. |
| |
5 Divider (DV-S, M, R, T)
Divided the inside of chain vertically to prevent
cable from twisting and sheath damage
caused by friction. There are S, M, R
and T type.
Not apply the DV-T to ES Type |
| |
6 Skid
To minimized inference above and under
chain during moving, fnicfion side of skid
was chamfered and developed to protect
against damage from inteference. |
| |
7 Free End Bracket (FEB)
Free End Bracket is very effective in a way
that it can be mounted up, down and front.
It can be fixed stronger by steel washer.
Shift Chain can be fixed with the diverse
ways because FEB can be moved more
than 45 degrees.
For S-Type don't need to put BR on FEB. |
| |
8 Tie Wrap (TW)
Tie Wrap fixes the cable in one straight line
and prevent the cable from twisting and entangling
during operation. There are two
types available depending on the application
: attached to bracket and separated
from bracket. |
| |
9 System Tie Wrap (STW)
System-Tie Wrap has to be assembled on
fixing and moving point of bracket and can
be assembled wthout any tie wrap plate.
This tie wrap is used to stay the cables on
several floors prevent the cables from being
twisting and it can also be assemble without
any tools or bolt. This tie wrap has two
types, one is to assemble inside bracket
the other one is outside. |
| |
|
|
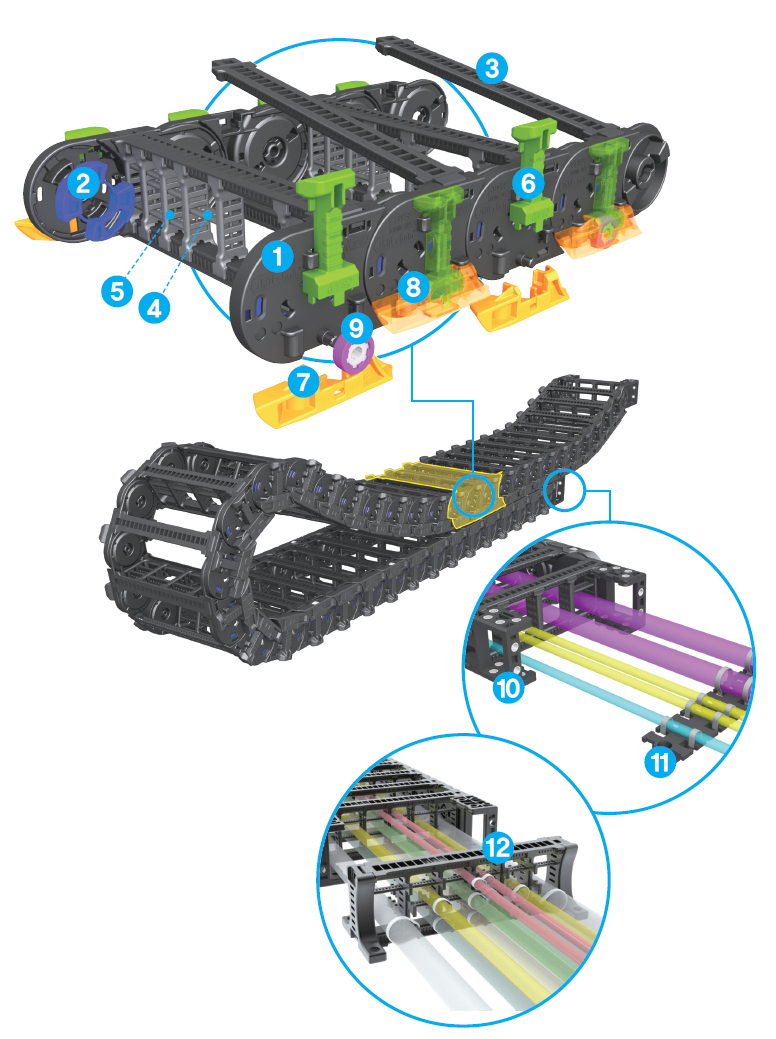
ARTICLE NAME & DETAILS OF
SHIFT CHAIN-Roller Skid / Enclosed Roller Skid-Type |
| |
 |
| |
1 Side Band (SB)
Connecting Radius Value inserted Side
Band strengthen binding since the supporting
point of side band is designed as 6 separated
points.
|
| |
2 Bending Radius Unit (BR)
Shift Chain has the unique structure that
the value of Bending Radius is decided by
Bending Radius unit .
|
| |
3 Frame (FR)
[ FRU(D) ]
Frame is performed as a supporter of right
and left side bands and it is designed with
teeth to prevent divider from detaching.
|
| |
4 Separator (SP)
Dividing the inserted cables vertically to prevent
twisting of cables and damage of sheath.
Can be cut by 5mm for the convenience.
When combining with divider, using separator
pin it can be fixed hard not to move.
|
| |
5 Divider (DV-S, M, R, T)
Divided the inside of chain vertically to prevent
cable from twisting and sheath damage
caused by friction. There are S, M, R and T
type.
|
| |
6 Support
It is performed as a supporter of Skid and
Roller Skid. It makes Skid and Roller Skid
move up and down.
|
| |
7,8 Skid, Roller Skid
It is divided into Roller mounted Skid and
Roller unmounted Skid. Roller can be protruded
or hidden according to position of chain.
|
| |
9 Roller
Roller which is assembled with specific
bearing minimize friction for long-distance
travel.
|
| |
10 Free End Bracket (FEB)
Free End Bracket is very effective in a way
that it can be mounted up, down and front.
It can be fixed stronger by steel washer.
Shift Chain can be fixed with the diverse
ways because FEB can be moved more
than 45 degrees.
For S-Type don't need to put BR on FEB.
|
| |
11 Tie Wrap (TW)
Tie Wrap fixes the cable in one straight line
and prevent the cable from twisting and
entangling during operation. There are two
types available depending on the application:
attached to bracket and separated from
bracket.
|
| |
12 System Tie Wrap (STW)
System-Tie Wrap has to be assembled on
fixing and moving point of bracket and can
be assembled wthout any tie wrap plate.
This tie wrap is used to stay the cables on
several floors prevent the cables from being
twisting and it can also be assemble without
any tools or bolt. This tie wrap has two
types, one is to assemble inside bracket
the other one is outside.
|
|
ARTICLE NAME & DETAILS OF
SHIFT CHAIN-Enclosed Type |
|
| |
1 Side Band (SB)
Connecting Radius Value inserted Side
Band strengthen binding since the supporting
point of side band is designed as 6 separated
points.
|
| |
2 Bending Radius Unit (BR)
Shift Chain has the unique structure that
the value of Bending Radius is decided by
Bending Radius unit.
|
| |
3 Divider (DV-S, M)
There with the Dividers are three types of
the exclusive side divider(S-Type), of a role
to separate large mass of inner cables vertically
(M-Type), of a role to protect the sheath
demage of cables by equipment of rollers
to the divider(R-Type).
|
| |
4 Separator (SP)
Separator divides the inserted cables vertically
to prevent twisting of cables and damage
of sheath.
Can be cut by 5mm for the convenience.
When combining with divider, using separator
pin it can be fixed hard not to move.
|
| |
5 FRU, FRD
Hinged type frame, open one side, supports
connection of both side of side band and
have tongue and groove system plate to
secure the position of the divider on the
frame.
|
| |
6 Frame Pin (FP)
The connecting pin for preventing the
breakaway of Frame connected at Side
Band, combining and fixing the Frame and
Side Band.
For Shift chain(ST)072E, 092E, 120E, 150E
type, one side of the frame is fixed by inserting
a fixing pin to prevent frame open, which
caused by any external impact.
|
| |
7 Free End Bracket (FEB)
Shift chain is very effective to be able to be
fixed atupper, lower and front direction with
the use of FEB (Free End Bracket) like the
fixing method of Shift chain and to be fixed
stronger due to the use the Steel lnset at
the Fixing hole. Shift Chain has a strong
point that can be fixed with the diverse
ways.
This Bracket can be turned moved than 45
degrees. For ST150N, Bracket with steel is
used.
For ES / ERS-Type don't need to put BR on FEB.
|
| |
8 Tie Wrap (TW)
Tie Warp fixes to fix the cables in one straight
line to prevent twisting or entangling during
operation. There are two types available
depending on the application; attached to
bracket and separated from bracket.
|
| |
9 System Tie Wrap (STW)
System-Tie Wrap has to be assembled on
fixing and moving point of bracket and can
be assembled wthout any tie wrap plate.
This tie wrap is used to stay the cables on
several floors prevent the cables from being
twisting and it can also be assemble without
any tools or bolt. This tie wrap has two
types, one is to assemble inside bracket
the other one is outside.
|
|
|
|
|
| |
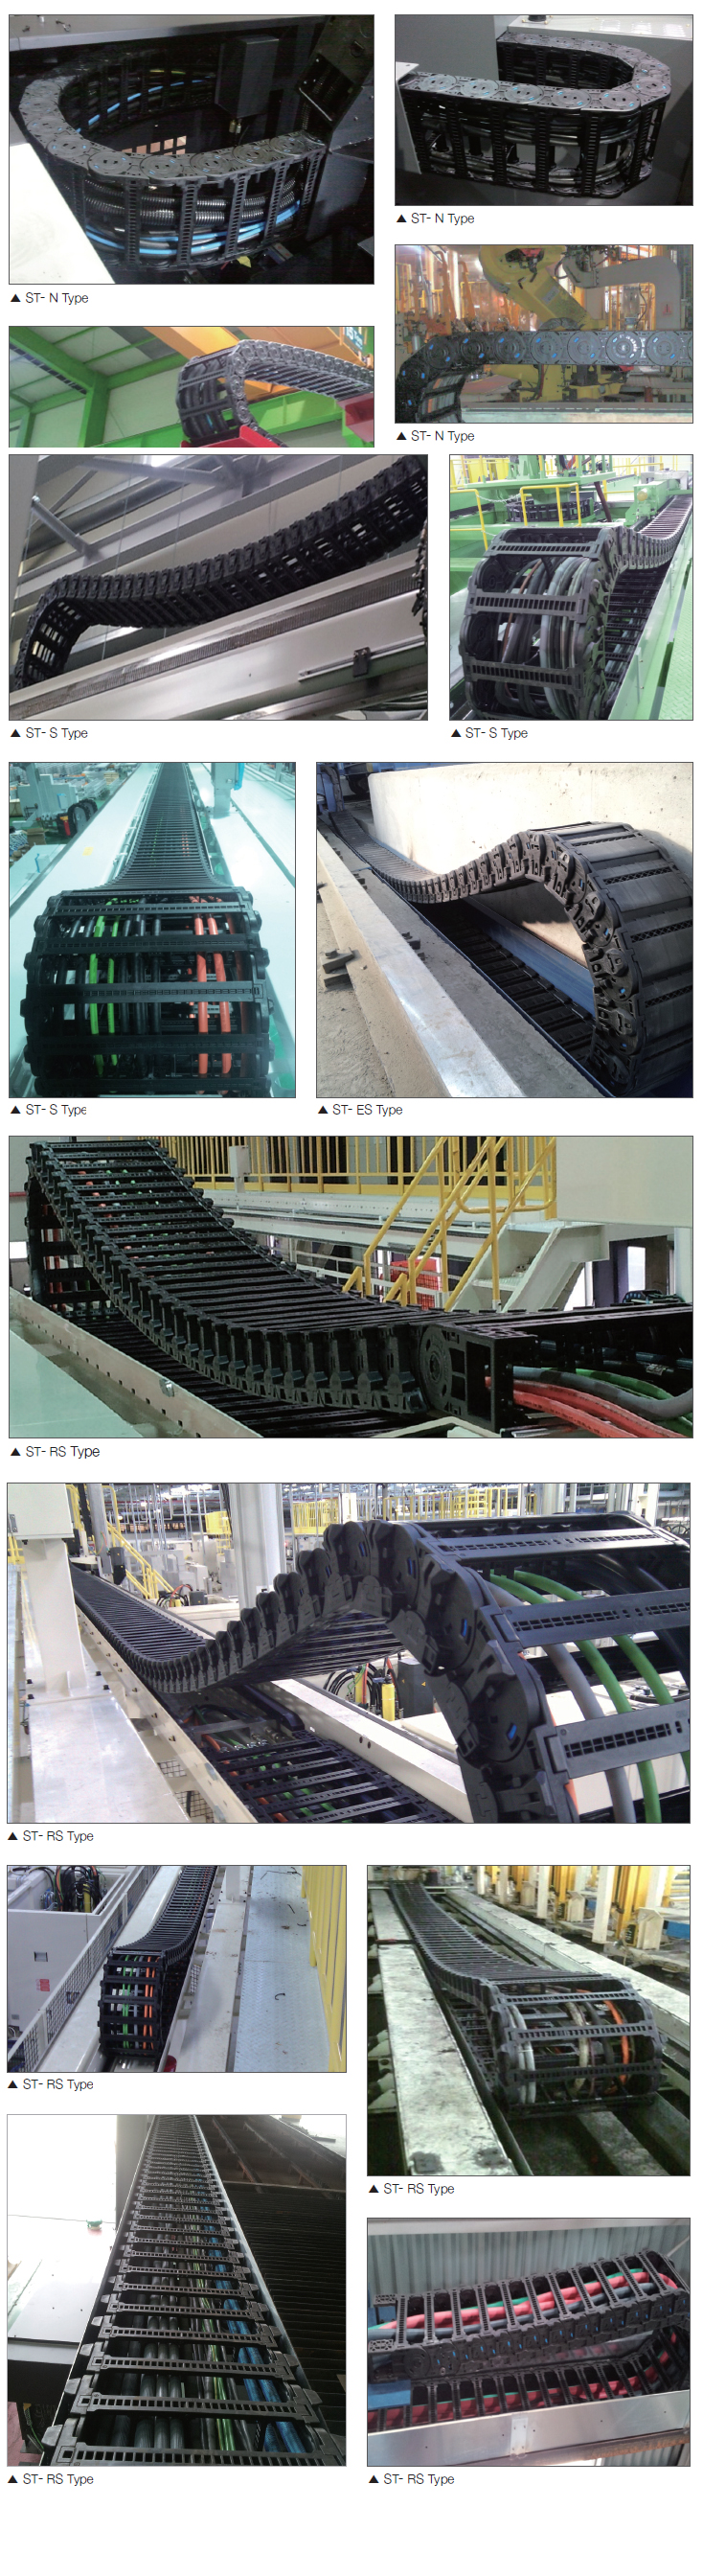
| ST - N : Normal Type |
(Dimensions in mm) |
Shift Chain
N Type
|
Pitch |
Bending RadIus(R) |
Weight
kg/m |
Speed
m/sec |
Temperature
�� |
Clearance |
Frame
style |
Divider
possible
with frame |
| |
|
|
|
|
|
| ST - S : Skid Type |
(Dimensions in mm) |
Shift Chain
S Type
|
Pitch |
Bending RadIus(R) |
Weight
kg/m |
Speed
m/sec |
Temperature
�� |
Clearance |
Frame
style |
Divider
possible
with frame |
| |
|
|
|
|
|
| ST - ES : Enclosed Skid Type |
(Dimensions in mm) |
Shift Chain
ES Type
|
Pitch |
Bending RadIus(R) |
Weight
kg/m |
Speed
m/sec |
Temperature
�� |
Clearance |
Frame
style |
Divider
possible
with frame |
| |
|
|
|
|
|
| ST - ERS : Enclosed Roller Skid Type |
(Dimensions in mm) |
Shift Chain
ERS Type
|
Pitch |
Bending RadIus(R) |
Weight
kg/m |
Speed
m/sec |
Temperature
�� |
Clearance |
Frame
style |
Divider
possible
with frame |
| |
|
|
|
|
|
| ST - RS : Roller Skid Type |
(Dimensions in mm) |
Shift Chain
RS Type
|
Pitch |
Bending RadIus(R) |
Weight
kg/m |
Speed
m/sec |
Temperature
�� |
Clearance |
Frame
style |
Divider
possible
with frame |
| |
|
|
|
|
|
|
|
|
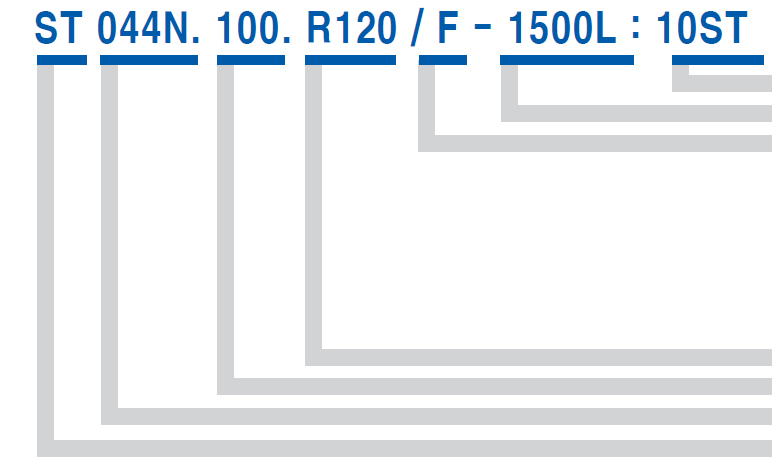
| |
|
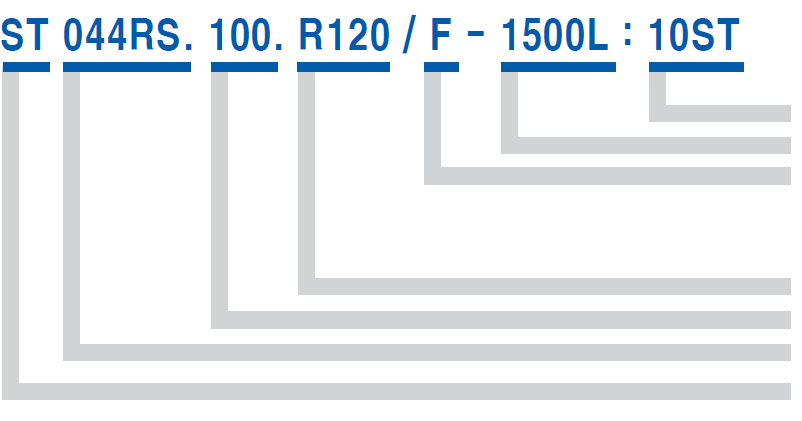
| ORDERING |
 |
|
| Q��ty(set) |
| Length(mm) |
F : Free End Bracket
G : Guide Channel Type End Bracket(Unity Systems)
V : Vertical Guide Type End Bracket(Unity Systems)
T : Tie Wrap
S : System Tie Wrap |
| Bending radius |
| Inside Width |
| Normal Type(N) |
| Shift Chain |
|
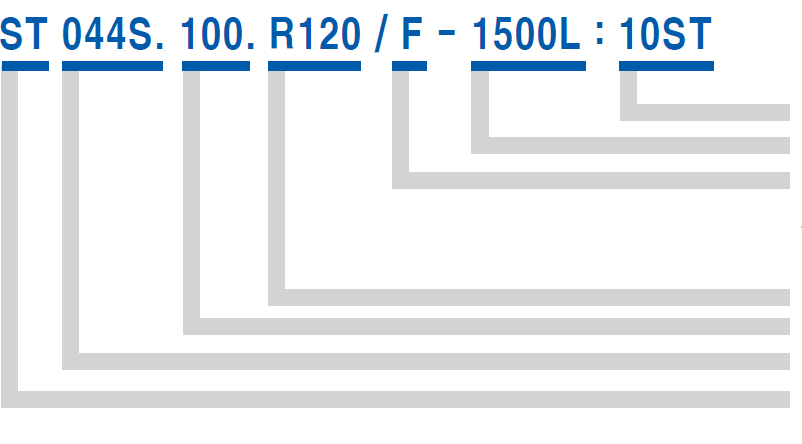
| ORDERING |
 |
|
| Q��ty(set) |
| Length(mm) |
Free End Bracket
F : Free End Bracket
T : Tie Wrap
S : System Tie Wrap |
| Bending Radius |
| Inside Width |
| Skid Type(S) |
| Shift Chain |
|
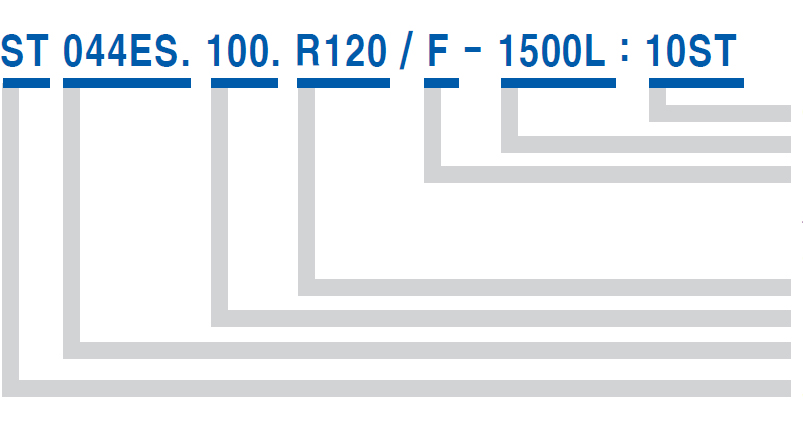
| ORDERING |
 |
|
| Q��ty(set) |
| Length(mm) |
Free End Bracket
F : Free End Bracket
T : Tie Wrap
S : System Tie Wrap |
| Bending Radius |
| Inside Width |
| Enclosed Skid Type(ES) |
| Shift Chain |
|
| ORDERING |
 |
|
| Q��ty(set) |
| Length(mm) |
Free End Bracket
F : Free End Bracket
T : Tie Wrap
S : System Tie Wrap |
| Bending Radius |
| Inside Width |
| Roller Skid Type |
| Shift Chain |
|
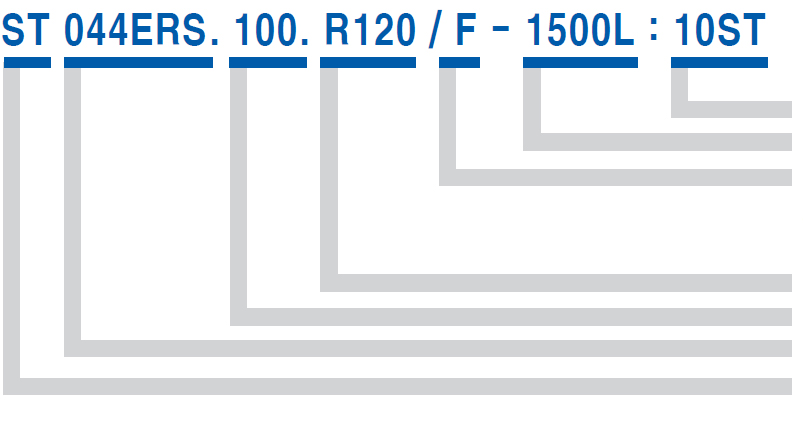
| ORDERING |
 |
|
| Q��ty(set) |
| Length(mm) |
Free End Bracket
F : Free End Bracket
T : Tie Wrap
S : System Tie Wrap |
| Bending Radius |
| Inside Width |
| EnclosedRollerSkidType( |
| Shift Chain |
|
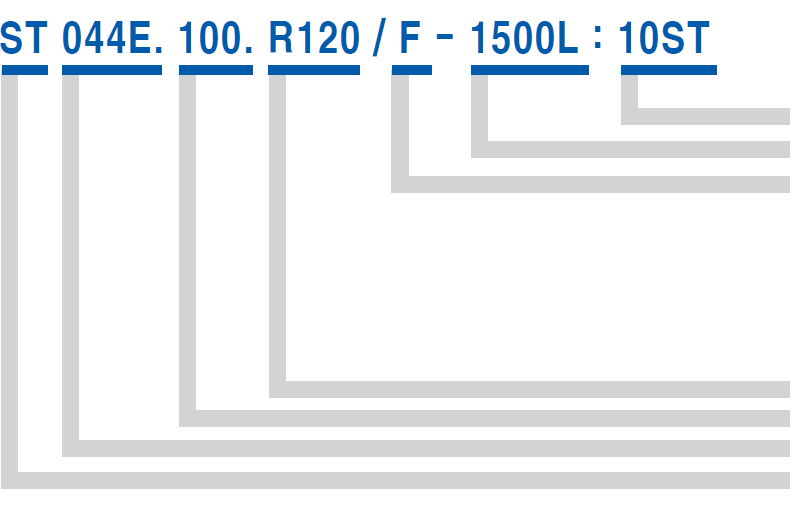
| ORDERING |
 |
|
| Q��ty(set) |
| Length(mm) |
F : Free End Bracket
G : Guide Channel Type
V : Vertical Guide Type |
| Bending Radius |
| Inside Width |
| Enclosed Type |
| Shift Chain |
|
|
| |
|
|
|
| |
|
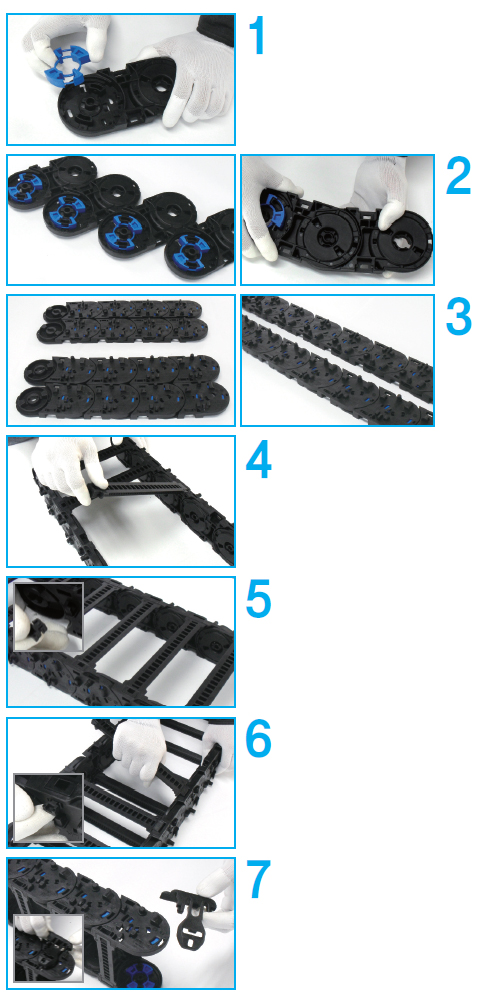
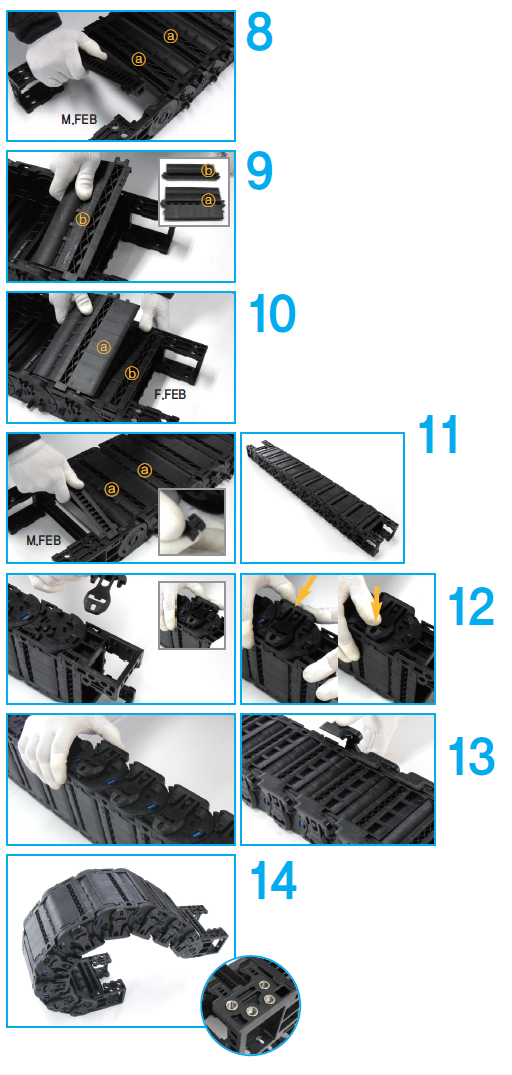
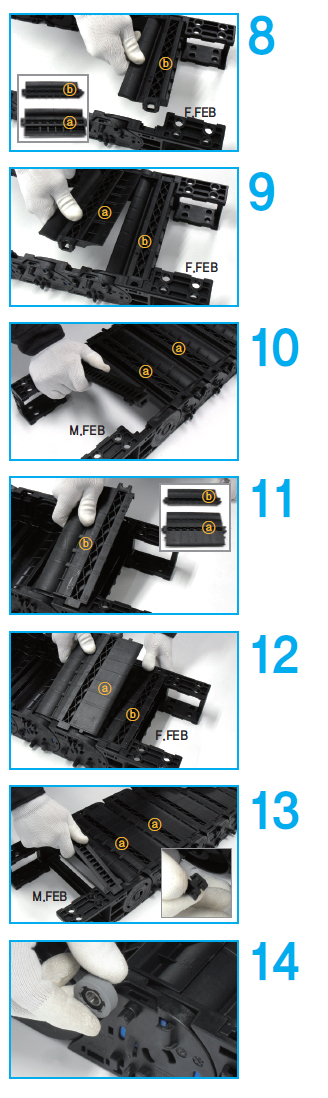
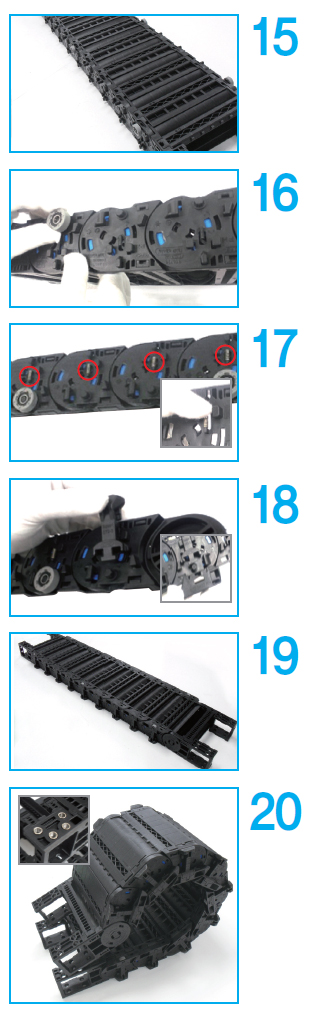
ASSEMBLY PROCEDURE / ST Normal Type |
| |
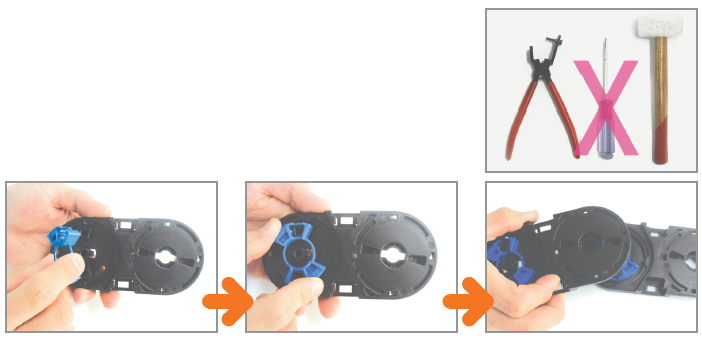
The assembling process of Shift Chain N-Type is like below and you must use rubber hammer
with careful combination of Divider and Separator. Be careful of different assembling process
depending on product specification such as ST044N, 055N Type, ST072N, 095N, 120N Type,
ST150N Type etc. |
| |
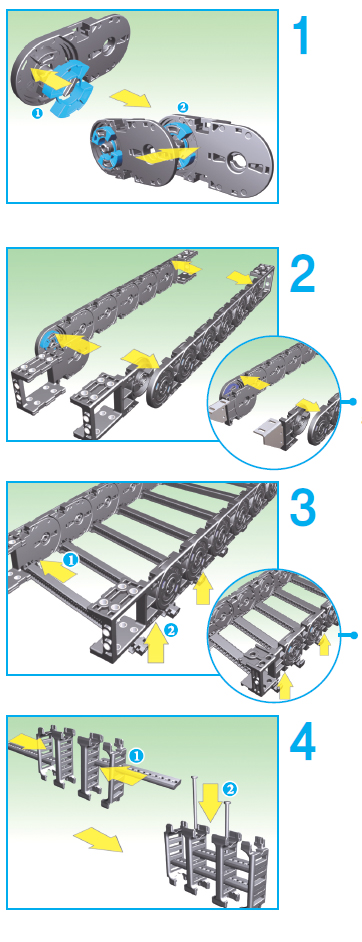 |
| Insert BR unit to each side band, connect the side bands
as many as you need, then do the same process to the other
side of side band. |
Assemble the end brackets on both ends using the same
method. |
Attach frames to one side groove on the frames, then
the other side.
For ST150N,
assemble steel brackets on both ends.
|
Attach frames to one side groove on the side band,
and then the other side.
ST 044N, 055N are Hinge Type or Hook Type without
frame pin. |
For ST072N, 095N,120N, and 150N, connect the pin of
separator in hole of divider after inserting separator in hole
of divider. For ST044N and ST055N, separator fixing pins
are not used. |
|
| |
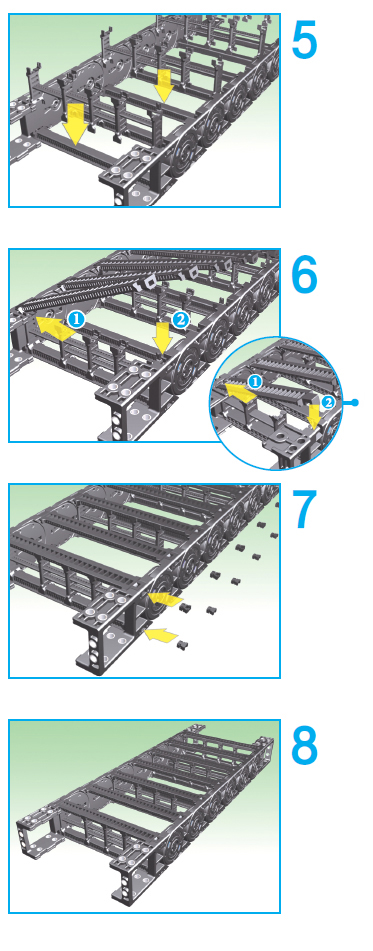 |
Fix the separator and divider patterns to the bottom-side
frames as needed. |
Attach frames to one side groove on the side band,
and then the other side. |
| ST044N, 055N frame type. |
| Insert frame pins to secure the frames and complete carrier.
(ST072N, 095N, 120N, 150N are applied with frame pin,
and ST044N, 055N are Hinge Type or Hook Type without
frame pin.) |
| Assembled Shift Chain N-Type is assembled. |
|
| |
|
|
|
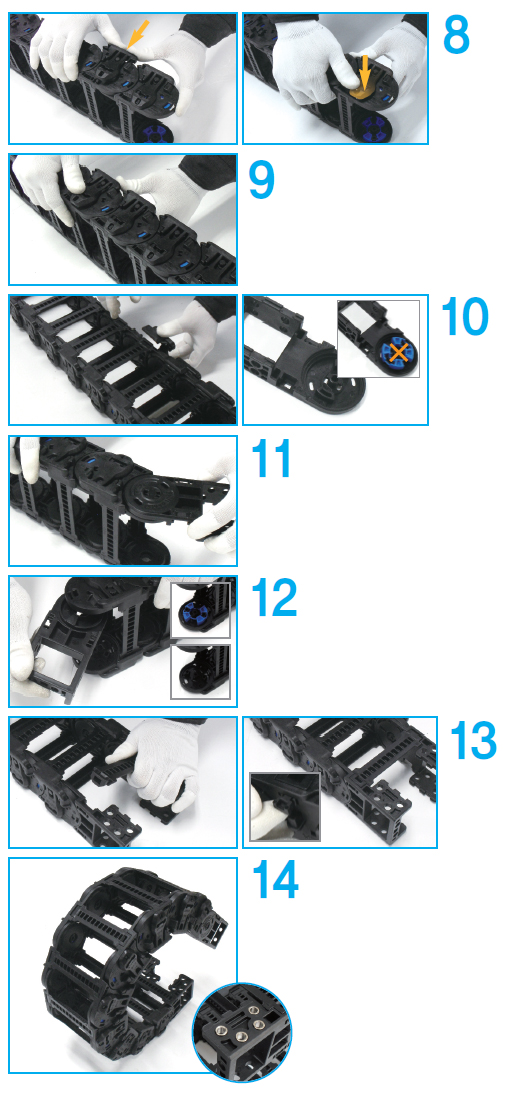
ASSEMBLY PROCEDURE / ST Skid Type |
| |
Assembly procedure of Shift chain S-type is as follows. The assembling process of shift Chain
ES-type is like below and you must use rubber hammer with careful combination of Divider and
Separator. (Disassembly process for repair and replacement are in reverse order) |
| |
 |
Insert BR Unit into each Side Band.
(Side Band is divided into right and left side according to the
direction.) |
| Continue to insert BR Unit into Side Band
as you want to make it. Assemble Side
Band which is inserted BR Unit as above. |
| Continue to connect each Side Band as
long as you want to make it.
Connect the Side Band as many as you
need. |
| Connect right and left link with specified frame.
(Put Hinge Type frame in the hole of Side Band). |
| Insert frame pin onto connected each Frame and side of Side
Band to be made tightly.
(To devide inner room, insert divider which is connected with
separator. |
| |
| Assemble opposite frame as same procedure. |
| Insert Skid to the protruding side of Side Band. |
|
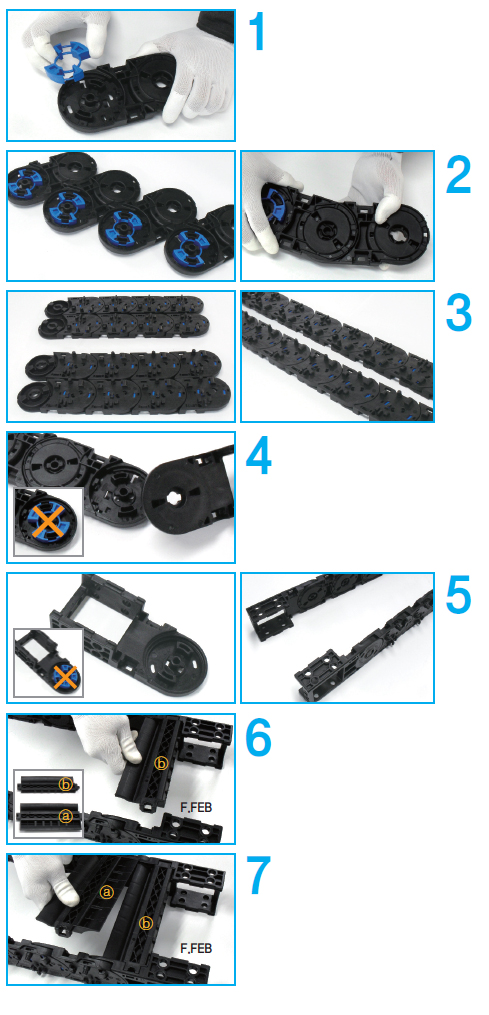
| |
 |
| When inserting a Skid, push tightly to
the home of Side Band until you hear
"click"(Skid is divided each direction
like right and left.) |
| Assembly the Skid on the entire connected Side Band as same way. |
| Assembly the Skid on the entire connected
opposit side as well. Do not insert
a BR Unit to M.FEB.
(M.FEB will be making a turn to up and
down) |
| Assembly M.FEB to be corrective each direction such as right
and left. |
| Assembly F.FEB to be suitable each direction such as right and left.
(Do not insert a BR Unit for the Side Band which is connected
with F.FEB) |
| Assembly a specified frame in M.FEB
and F.FEB.
(Hinge is inserted into RH direction of FEB)
Insert Frame pin into connected frame
and side of FEB. |
| Insert steel washers into FEB according to fixing direction. |
| |
|
| |
|
|
|
ASSEMBLY PROCEDURE / ST Enclosed Skid Type |
| |
Assembly procedure of Shift chain ES-type is as follows. The assembling process of shift Chain
ES-type is like below and you must use rubber hammer with careful combination of Divider and
Separator. (Disassembly process for repair and replacement are in reverse order) |
| |
 |
| Insert BR Unit into each Side Band.
(Side Band is divided into right and left side according to the
direction.) |
| Continue to insert BR Unit into Side
Band as you want to make it. Assemble
Side Band which is inserted BR Unit as
above. |
| Continue to connect each Side Band
as long as you want to make it.
Connect the Side Band as many as you
need. |
| Assemble the F.FEB according to the direction of right and left side.
-Do not insert the BR Unit to Side Band connected to F.FEB
(Side of F.FEB is not enclosed) |
| Do not insert a BR to M.FEB. (M.FEB
will be making a turn to up and down)
Assemble the M.FEB according to the
direction of right and left side.
(Side of M.FEB is not enclosed) |
Insert one Shaped-FRD into F.FEB.
[ : Normal FRD : Built-up only for F.FEB]
-Find one shaped-FRD and insert it with the hinge facing RH
direction, as above. |
| Continue to insert the FRD( -Normal FRD)with the hinge facing
RH direction,
-Assemble the from F.FEB to M.FEB in order. |
|
| |
 |
| Insert the frame as many as you need and insert them one by one
with the hinge facing RH direction, as above.
(M.FEB is not turned to up and down when FRD assembling) |
| Insert the shaped-FRD inserted to F.FEB and insert it with the
hinge facing RH direction, as above.
(: Normal FRD : Built-up only for F.FEB) Insert the divider
with separator to divide the inside of chain. |
| Continue to insert the FRU(: Normal FRU)with the hinge facing
RH direction,
-Assemble the from F.FEB to M.FEB in order. |
| Insert Normal FRU as many as you need and insert
them one by one with the hinge facing RH direction,
as above. Insert Frame-pin into the hole which is seen
where the end of FRU and Side Band meet. (M.FEB
is not turning to up and down) when FRU assembling)
Check that FRU and FRD are assembled correctly. |
| Insert Skid into mounted Side Band.
Insert Skid into groove of Side Band
until you hear the"click". (Skid is also
divided into LH and RH) |
| Insert the Skid to all Side band in same
way. Insert the Skid to opposite side of
each Side Band in the same way. |
| Insert steel washers into M.FEB and F.FEB. |
|
| |
|
|
|
ASSEMBLY PROCEDURE / ST Roller Skid Type |
| |
Assembly procedure of Shift chain RS-type is as follows. The assembling process of shift Chain
RS-type is like below and you must use rubber hammer with careful combination of Divider and
Separator. (Disassembly process for repair and replacement are in reverse order) |
| |
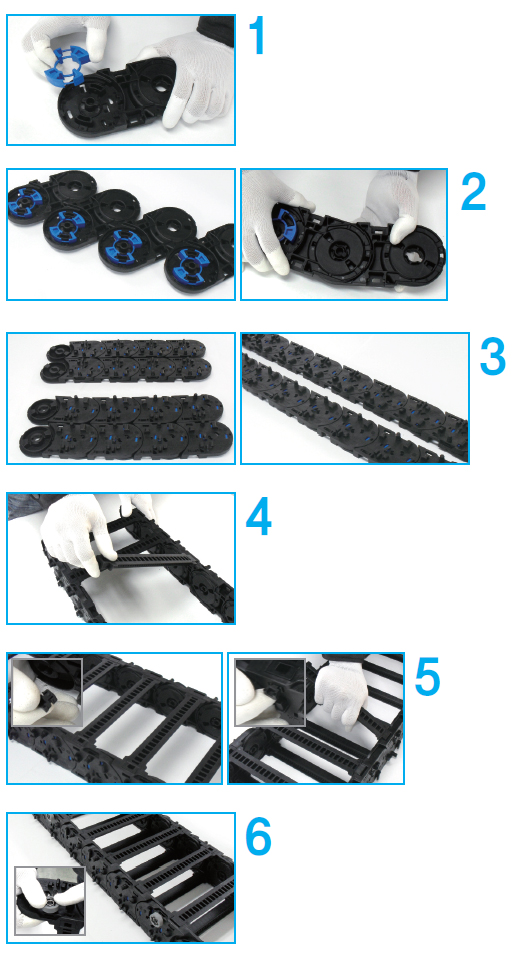 |
| Insert BR Unit into each Side Band
(Side Band is divided into right and left side according to the
direction.) |
| Continue to insert BR Unit into Side
Band as you want to make it. Assemble
Side Band which is inserted BR Unit as
above. |
| Continue to connect each Side
Band as long as you want to
make it. Connect the Side Band
as many as you need. |
| Connect right and left link with specified frame.
(Put Hinge Type frame in the hole of Side Band) |
| Insert Frame Pin onto connected each
Frame and side of Side Band to be made
tightly.(to devide inner room, insert divider
which is connected with separator.
Assemble opposite frame as same procedure. |
| Install a Roller in the protruding side of Side Band to be placed
one roller per 4 link. |
| |
|
| |
 |
| When inserting a support, push tightly into groove of Side Band
until you hear "click".
(Support is only one direction without right and left side) |
| Insert normal type Skid into the side of Side Band which is not
assembled a roller.
Assemble roller type Skid and normal type Skid for the each side
of Side Band. |
| Assemble skid and support into opposite side of Side Band as
same way.
(Check whether assembled skid is working well by pushing your hand) |
| Do not insert a BR Unit for M.FEB.
(M.FEB will be making a turn to up and
down) Assembly M.FEB for being
correct direction like right and left. |
| Assembly specified frame in M.FEB.
(Hinge is inserted into RH direction
of FEB)
Insert Frame pin into connected
Frame and side of FEB. |
| Assembly F.FEB for being correct
direction like right and left.(Do not
insert a BR for the side band which
is connected with F.FEB) Insert
reinforcement washers into FEB
according to fixing direction. |
| Completion. |
|
|
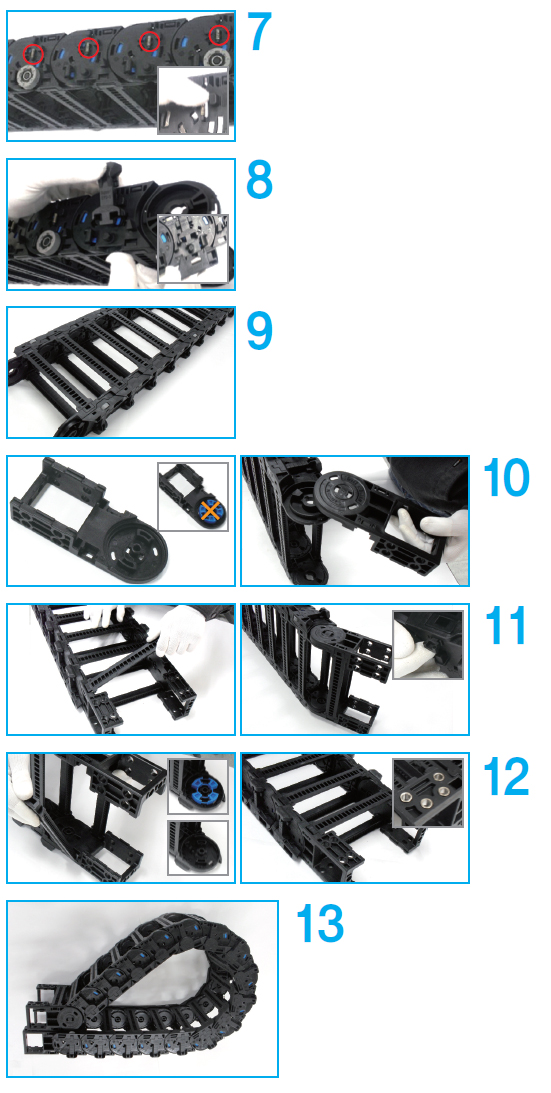
ASSEMBLY PROCEDURE / ST Enclosed Roller Skid Type |
| |
Assembly procedure of Shift chain ERS-type is as follows.The assembling process of shift Chain
ERS-type is like below and you must use rubber hammer with careful combination of Divider and
Separator. (Disassembly process for repair and replacement are in reverse order ) |
| |
 |
| Insert BR Unit into each Side Band.
(Side Band is divided into right and left side according to the
direction.) |
| Continue to insert BR Unit into Side
Band as you want to make it.
Assembly Side Band which is inserted
BR Unit as above. |
| Continue to connect each Side Band as long as you want
to make it. |
| Connect the Side Band as many as you need. |
| Assemble the F.FEB according to the direction of right and left side.
(Do not insert the BR Unit to Side Band connected to F.FEB.
Side of F.FEB is not enclosed.) |
| Do not insert a BR to M.FEB.
( M.FEB will be making a turn to up and down.) |
| Assemble the M.FEB according to the direction of right and left side.
(Side of M.FEB is not enclosed.) |
|
| |
 |
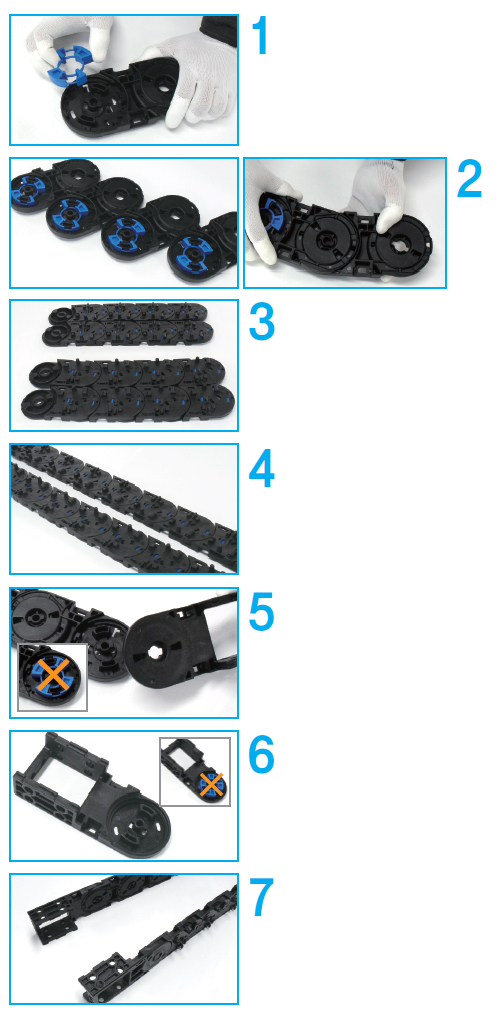
| Insert one Shaped-FRD into F.FEB. (: Normal FRD :
Built-up only for F.FEB)Find one shaped-FRD and insert it
with the hinge facing RH direction, as above. |
| Continue to insert the FRD(: Normal FRD) with the hinge facing
RH direction.
(Assemble the from F.FEB to M.FEB in order.) |
| Insert the frame as many as you need and insert them one by
one with the hinge facing. RH direction, as above.
(M.FEB is not turned to up and down when FRD assembling ) |
| Insert the shaped-FRD inserted to F.FEB and insert it with
the hinge facing RH direction, as above. (: Normal FRD :
Built-up only for F.FEB)
Insert the divider with separator to divide the inside of chain. |
| Continue to insert the FRU(: Normal FRU)with the hinge facing
RH direction.
(Assemble the from F.FEB to M.FEB in order.) |
| Insert Normal FRU as many as you need and insert them one
by one with the hinge facing RH direction, as above. Insert
Frame-pin into the hole which is seen where the end of FRU and
Side Band meet.
(M.FEB is not turning to up and down when FRU assembling.) |
| Insert Roller into mounted Side Band. |
|
| |
 |
| Continue to insert Roller into Side Band.
Basically, you insert one roller per 4 Link. |
| Insert Roller Skid into Side Band where roller inserted in.
Skid is divided into Roller Skid (Skid with mount for roller) and
normal Skid. (Skid without mount) |
| Insert support into groove of side band until you hear
the "click". (Same support for both LH and RH.) |
| Insert a normal Skid into Side Band which is not inserted a roller. |
| Insert Skid and Support into all Side Band links.
(Check that Skid is working up-and-down properly when you
push the assembled Skids by hands.) |
| Insert steel washers into M.FEB and F.FEB. |
|
|
|
|
| |
|